


Liquidation gold a guide for amazon sellers pdf merge
31 comments
Bitcoin exchanges state of themarket
Children are getting fewer and fewer chances to explore with interesting materials—but few things spark creativity in kids more than a set of interesting materials and the promise of creating something wonderful. It is likely that most of your children will have come in contact with snow globes before…but also likely that none of them imagined they could create their own from simple ingredients.
Gather materials for your students to include in their snow globes. If you have time, make a snow globe. These objects need to be small enough to stand up in the glass or plastic jars, and narrow enough to fit on the inside of the jar lids.
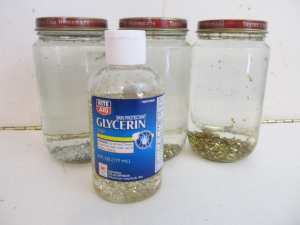
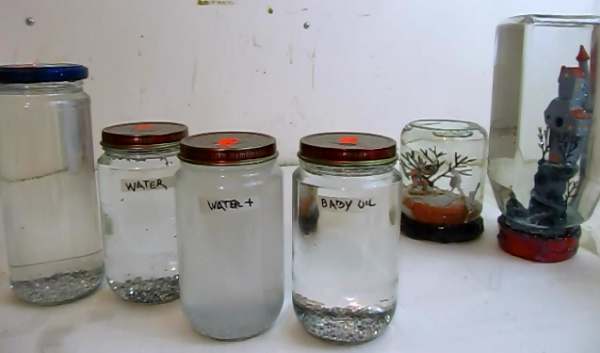
And because they will be in water and other liquids, they should be made of plastic. Some non-corrosive metals might work too, but plastic is the safest bet. If you are having trouble finding good, fun objects for the snow globes, you can purchase cheap items online. Are all glitters created equal? Many will work well, but some will float in water, while others will sink too quickly.
Test your glitter out beforehand to make sure it does what you want it to do. The instructions that follow are for making snow globes as an art activity. If you are working with older children and would like to challenge them to explore the viscosity of different liquids and the properties of different kinds of glitter that might be used in the snow globes, try the Snow Globe Science activity in this curriculum.
Ask your students if they have ever held or seen snow globes before. What do you do with them? What is usually in them? Tell them that they will be making their own globes out of simple materials. While their glued scenes are drying, bring the kids together to talk about what they have created so far. How did they decide what objects to use? Did they create a scene from their lives, or one that they imagined? What should they put into their snow globes next? Is it a good idea to start with a lot or a little?
Then, have them dip a toothpick or plastic fork into a bit of dish soap and touch the soapy end of the toothpick to the surface of the water in their jar, so that only a little bit of soap gets in. This will help the glitter sink after they add it. Have them add their glitter, but easy does it! Each child should start with just a little glitter, screw the lid on and shake the snow globe up.
Are they happy with the results? The glitter may be clumpy at first, but that will change. Tags Gift , Holiday , Winter. Let it snow, let it snow, let it snow!
Suggested Materials 1 small glass or plastic jar per student large baby food jars work well Water Glitter Hot glue gun and glue sticks Small plastic objects and recycled materials See Preparation , below Pipe thread tape rolls — found in any hardware store Dish soap you only need a little Toothpicks or plastic forks Spoons.
Opening Discussion The instructions that follow are for making snow globes as an art activity. The Challenge Make your own beautiful snow globe using the materials provided. Tell them that they will first create their scenes, then they can fill the jars with water and glitter.
Plug in the hot glue gun you should be in charge of this unless you are working with older children , and tell them that they will be gluing their objects to the inside part of the lid of their jar. Give them time to create their scenes.
For younger children, have them bring their lids and objects to you to glue. They should tell you exactly where they want each object. Make sure they have tested to see if the objects fit by screwing the jar onto the lid with the objects placed on the lid. For older children, you might let them do their own gluing, but again stress that they test to see that the objects fit before gluing them on.
Have kids tightly wrap some of the pipe thread tape around the threads of the jar—3 or 4 turns around the jar should do. The tape can be pressed down and will adhere to itself—this tape will provide a water-tight seal between the lid and the jar. Suggestions This is a great activity for kids to create winter holiday gifts for their families. If you are working with older children, you can investigate the properties of the materials used to make snow globes in the Snow Globe Science activity in this curriculum.
Students will explore the different viscosities of potential snow globe liquids; the properties of different shaped and weighted glitter; and which combinations make the most successful snow globes.
Large baby food jars work well and you can likely ask families to bring them in. If you would rather purchase jars, they can be found online at several sites.
McMaster-Carr click here to visit their website carries wide-mouthed plastic and glass jars, both of which work well for this activity. Several websites sell very inexpensive small plastic objects that would work well in these snow globes. In particular, Oriental Trading Company has a wide and cheap assortment.